Wednesday, January 2, 2013

Snowman Cookies & Santa Hat Brownies

Hello to anyone who reads the blog!

Sorry I haven't posted in a while. I had a very painful knee surgery and then was hospitalized again for other issues so this is the first time I've had the chance.

So, over the holidays, I made some holiday treats inspired by Pinterest and I thought I'd share how I made them since the Pins of the cookies did not instruct exactly how to make them.

The two projects I tried to recreate were:
Melting Snowman Cookies  &  Santa Hat Brownies 

  
The Melting Snowman Cookies were definitely tougher than they looked! I didn't have time to make cookies myself, so I used store-bought sugar cookies. I put icing on the cookie in the shape of a puddle. Then I cut a marshmallow in two (harder than it sounds, I found it easier to twist apart) and placed it on the icing. Then I put the cookie in the microwave for 20 seconds on full power. When it came out, I made sure the marshmallow was sitting properly, sometimes it would slide off the cookie. Do this fast, there's a short window of time to do so. Then I let the cookie sit for a while and when it was no longer hot, I decorated similarly to the photo above. I originally tried using orange icing from the container with a small nozzel but it ran down the marshmallow so I resorted to using a corn holder (you could use anything sharp and fine) to draw the icing on myself. For the arms, mouth, scarf and buttons I used writing icing tubes. 
The Santa Hat Brownies were as simple as they looked, but be warned, the strawberries over time may slip off or the cream may not stay in place. I used pre-made brownies like the ones in the photo above. I coated the top with chocolate frosting, which is a bit of a surprise since it will be hidden. Next, I put creme from a cannister (easier to do this way, believe me) and made a circle of creme in the center. Don't make it extend to the edges. When you push the strawberry down, it will spread out. Next, I cut the top off a strawberry and placed it on, as shown above. I covered the top in a small dollop. It was so easy, I made many during the party itself. 
Here's a photo of the result:

Hope you enjoy! Post photos in the comments if you try them yourself :) 

Wednesday, November 7, 2012

Subscribe!

Hello! Later, I'm going to post photos of my newest endeavor, Game of Thrones themed applique! I’ve recently been really interested in applique and felt work on different surfaces such as bags and pillows.

First though, I'd like to offer subscribers to my blog a coupon for my Etsy shop. Subscribe to my posts via the RSS button on my blog and comment and I'll send you a coupon! Also, if you have your own blog, I'd be happy to subscribe back.


Monday, November 5, 2012

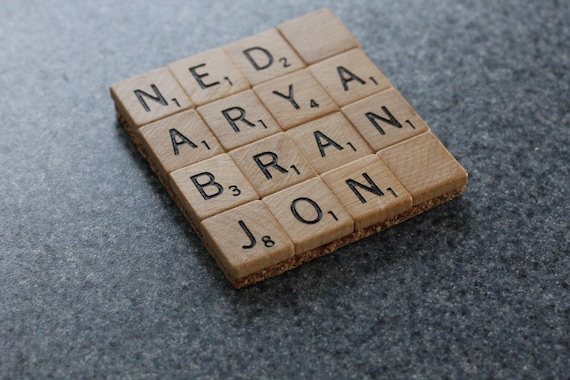
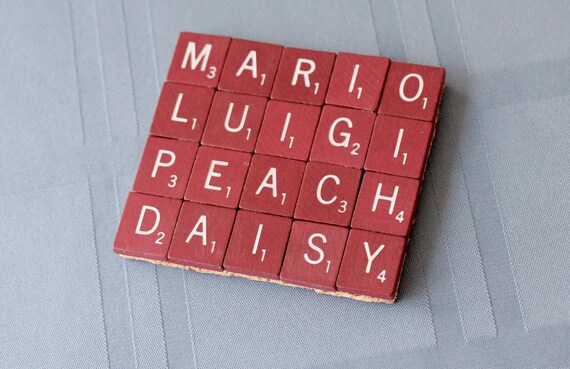
Upcycled Game of Thrones Themed Scrabble Tile Coasters


One item that I've been seeing often on Pinterest is the scrabble tile coaster. This appeals to me instantly because it involves upcycling.

To find the materials to make this, I bought an old scrabble board and tiles from a yard sale. I hope to use the board itself in future projects. If you plan on making multiples, keep in mind that certain letters will disappear fast!

Most often, I've seen these coasters with terms like 'beer', 'hops', 'brew', and 'shot', but I wanted to make some with a geeky theme, so I decided to make some with characters names from Game of Thrones (one of my favorite shows) instead. I made two coasters with varying names. I also made a Mario Kart themed one.

Here is the final result:


Although there are many tutorials for making this sort of item, the one I referenced most often was from thegourmetgab.

To make this you will need:
wood glue
modge podge
scrabble tiles
thin cork
xacto knife

Steps:
  • First, I made a list of names I wanted to use that were of the same length (or shorter if there are enough blanks in the set). Select names or words that are 4x4 or 5x5. I figured out the order I wanted to list the names and made sure it didn't spell out anything unintentionally. 

  • Then I measured the tiles and cut a piece of thin cork that I had lying around to match. Scrabble tiles are of slightly varying sizes so don't be surprised if they don't line up perfectly.

  • I coated the cork with wood glue and placed the tiles on and lined them up. I suggest placing them quickly and moving them around to the right spot as soon as possible because soon you won't be able to align them.  

  • Then I measured the tiles and cut a piece of thin cork that I had lying around to match. Scrabble tiles are of slightly varying sizes so don't be surprised if they don't line up perfectly.After allowing the glue to dry,  I coated it with modge podge to make the coaster water resistant.


Both the Mario and Game of Thrones coasters are available on my Etsy shop 'WickedGeekyCrafts' but I highly recommend you try making your own as they are very easy to make!

  Follow Me on Pinterest

Hi! I’m Nicole. I’m 22 and I’m a geek with a particular admiration for DIY crafts of the nerdy nature. Recently, I realized I should spend time doing some of the projects I gawk at on Pinterest instead of just repinning them..and yet I don’t have much technical background. That’s okay though because I use the wondrous invention that is the internet to learn about how to make things that interest me!

I’ll be having surgery soon so I have plenty of down time and I really wanna use this time to take a look at interesting crafts that are spreading through Pinterest, Craft Gawker, Craftster and other sites to recreate it hopefully with my own style.


I love crafts, but I tend to make geeky ones, for particular fandoms. Anything Doctor Who, Star Wars, Game of Thrones, The Walking Dead (the list could go on for so long) related really gets me excited. I’m a gamer, a cosplayer and a serious Sci Fi/ Fantasy fan so I generally try to keep my crafts in the crafty arena so they can appeal to people like me who just can’t get enough geeky things. 


Mostly, I want to do crafts that anyone can do, and that don’t require crazy equipment or amazing technical skills. I began learning to sew by making a plushie doll, then taught myself applique and now I wish to learn embroidery. 


I have plenty of craft related books and sites to learn from & I hope to share the knowledge that I learn and techniques with other beginner crafters like me! 
I’d also like to note that I’m a huge fan of the upcycling movement. I’m always looking for ways to re-use items that might be considered worth trashing, giving it a new look and new purpose. I frequently check out yard sales and thrift stores for items that I can see myself manipulating or decorating, so I will be certain to feature those projects.

I’ll be making crafts that are inspired by people’s projects online and some that are just my own crazy inventions. My interest in crafts has been peaking lately so I decided to start a blog and an etsy shop! I will probably end up putting most of my projects on the etsy shop, except of course those that I can’t part with! 

Thank you to the few that might read my blog! Please feel free to comment or suggest projects to try or show me how your projects are going! I am an avid Pinterest user and I will be linking to projects I find on there but I would also be happy to mention or promote other crafters whose works I’m especially fond of! Hope you like what’s to come.

- Nicole